Navigationを用いて画面遷移をやってみる。具体的には以下の処理を行う。
Fragment01とFragment02を用意する Fragment01でボタンが押されたらFragment02に遷移する Android Kotlin Fundamentals Course での03辺りを勉強した記録なので、詳しいことはそちらに載っている。
Navigationについて# 異なるFragment間の遷移を制御する仕組み。遷移の設定を視覚的に行えるらしい。
これ以前はIntentという仕組みを用いていたらしい。これについては必要になりそうならいつか調べる。
プロジェクト作成# Empty Activityを選択し、名前をNavigation Testとする。
build.gradle(Module: app)でDataBindingを有効にしておく。
Fragmentの作成# layouts/にFragmentを作成する。“Create layout XML?“だけチェックをつけておく。Fragmentは2つ作成し、それぞれ"Fragment01"と"Fragment02"とする。xmlファイルはそれぞれfragment_fragment01.xml、fragment_fragment02.xmlとする。
まずTextViewのtext要素に設定するための定数をstrings.xmlに内容を追加しておく。
1
2
3
4
5
6
7
8
9
<resources>
<string name= "app_name" > NavigationTest</string>
<!-- TODO: Remove or change this placeholder text -->
<string name= "hello_blank_fragment" > Hello blank fragment</string>
<string name= "fragment01" > Fragment01</string>
<string name= "fragment02" > Fragment02</string>
<string name= "click" > Click</string>
</resources>
fragment_fragment01.xmlの内容は以下の通りにする。Buttonを追加し、textを@string/clickに設定する。TextViewのtextを@string/fragment01に設定する。また全体をConstraintLayoutで包み、DataBindingのためにlayoutでさらに包む。
 1
 2
 3
 4
 5
 6
 7
 8
 9
10
11
12
13
14
15
16
17
18
19
20
21
22
23
24
25
26
27
28
29
30
31
32
<?xml version="1.0" encoding="utf-8"?>
<layout xmlns:android= "http://schemas.android.com/apk/res/android"
xmlns:app= "http://schemas.android.com/apk/res-auto"
xmlns:tools= "http://schemas.android.com/tools"
tools:context= ".Fragment01" >
<androidx.constraintlayout.widget.ConstraintLayout
android:layout_width= "match_parent"
android:layout_height= "match_parent" >
<TextView
android:id= "@+id/text_fragment01"
android:layout_width= "wrap_content"
android:layout_height= "wrap_content"
android:text= "@string/fragment01"
app:layout_constraintBottom_toBottomOf= "parent"
app:layout_constraintEnd_toEndOf= "parent"
app:layout_constraintStart_toStartOf= "parent"
app:layout_constraintTop_toTopOf= "parent" />
<Button
android:id= "@+id/button"
android:layout_width= "wrap_content"
android:layout_height= "wrap_content"
android:text= "@string/click"
app:layout_constraintBottom_toTopOf= "@+id/text_fragment01"
app:layout_constraintEnd_toEndOf= "parent"
app:layout_constraintStart_toStartOf= "parent"
app:layout_constraintTop_toTopOf= "parent" />
</androidx.constraintlayout.widget.ConstraintLayout>
</layout>
fragment_fragment02.xmlもほぼ同じ。Buttonが無い点だけ異なる。
 1
 2
 3
 4
 5
 6
 7
 8
 9
10
11
12
13
14
15
16
17
18
19
20
21
22
<?xml version="1.0" encoding="utf-8"?>
<layout xmlns:android= "http://schemas.android.com/apk/res/android"
xmlns:app= "http://schemas.android.com/apk/res-auto"
xmlns:tools= "http://schemas.android.com/tools"
tools:context= ".Fragment02" >
<androidx.constraintlayout.widget.ConstraintLayout
android:layout_width= "match_parent"
android:layout_height= "match_parent" >
<TextView
android:id= "@+id/text_fragment02"
android:layout_width= "wrap_content"
android:layout_height= "wrap_content"
android:text= "@string/fragment02"
app:layout_constraintBottom_toBottomOf= "parent"
app:layout_constraintEnd_toEndOf= "parent"
app:layout_constraintStart_toStartOf= "parent"
app:layout_constraintTop_toTopOf= "parent" />
</androidx.constraintlayout.widget.ConstraintLayout>
</layout>
Navigationの作成# res/を右クリックして、“New” → “Android Resource File"をクリック。次のように設定。
File neme: navigation Resource Type: Navigation “OK"を押すと、ポップアップが出てきて、“Add dependencies?“みたいなメッセージが出てくるので"OK"を押す。このとき、Navigationを利用するための依存関係がbuild.gradle(Module: app)に設定されていることが確認できる。
1
2
3
4
5
dependencies {
    ...
    implementation 'androidx.navigation:navigation-fragment-ktx:2.1.0'
    implementation 'androidx.navigation:navigation-ui-ktx:2.1.0'
}
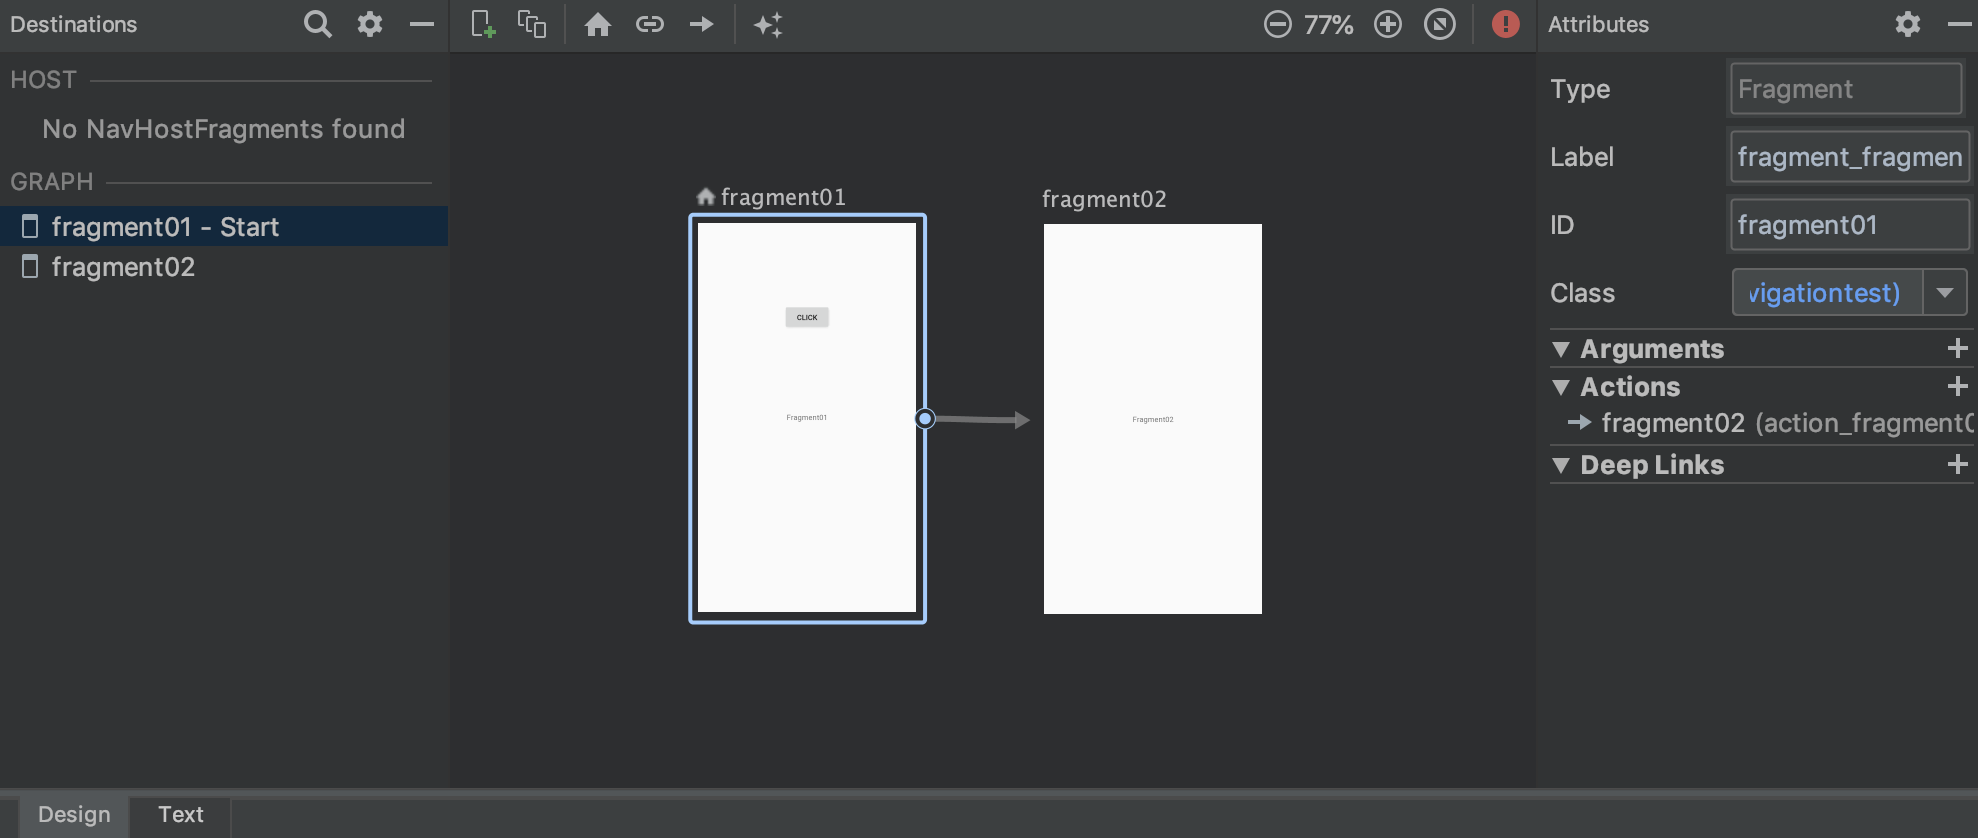
navigation/navigation.xmlができているので、それを開く。ここでFragmentの遷移が設定できる。+ボタンでFragmentを追加する。画面同士の接続関係はConstraintLayoutと同じ要領で行う。
以下のような接続関係にする。
textで表示すると以下のようになっている。
 1
 2
 3
 4
 5
 6
 7
 8
 9
10
11
12
13
14
15
16
17
18
19
20
21
22
<?xml version="1.0" encoding="utf-8"?>
<navigation xmlns:android= "http://schemas.android.com/apk/res/android"
xmlns:app= "http://schemas.android.com/apk/res-auto"
xmlns:tools= "http://schemas.android.com/tools"
android:id= "@+id/navigation"
app:startDestination= "@id/fragment01" >
<fragment
android:id= "@+id/fragment01"
android:name= "com.example.navigationtest.Fragment01"
android:label= "fragment_fragment01"
tools:layout= "@layout/fragment_fragment01" >
<action
android:id= "@+id/action_fragment01_to_fragment02"
app:destination= "@id/fragment02" />
</fragment>
<fragment
android:id= "@+id/fragment02"
android:name= "com.example.navigationtest.Fragment02"
android:label= "fragment_fragment02"
tools:layout= "@layout/fragment_fragment02" />
</navigation>
接続関係はaction要素として定義されている。id属性は、「ボタンを押した時遷移する」という処理を書くときに必要になるので注目しておきたい。
Navigationをactivity_mainに設定# activity_main.xmlを編集する。まずlayoutで全体を包み、さらにLinearLayout-fragmentと階層構造にしている。
fragmentのname属性にandroidx.navigation.fragment.NavHostFragmentを設定すると、このfragmentがNavigationとして振る舞うようになる。navGraphには接続関係を記したxmlファイルを指定する。ここではnavigation/navigation.xmlを設定している。defaultNavHost="true"としておくと、backボタンで戻れるようになるらしい。
 1
 2
 3
 4
 5
 6
 7
 8
 9
10
11
12
13
14
15
16
17
18
19
20
<?xml version="1.0" encoding="utf-8"?>
<layout xmlns:android= "http://schemas.android.com/apk/res/android"
xmlns:app= "http://schemas.android.com/apk/res-auto"
xmlns:tools= "http://schemas.android.com/tools"
tools:context= ".MainActivity" >
<LinearLayout
android:layout_width= "match_parent"
android:layout_height= "match_parent"
android:orientation= "vertical" >
<fragment
android:id= "@+id/myNavHostFragment"
android:name= "androidx.navigation.fragment.NavHostFragment"
android:layout_width= "match_parent"
android:layout_height= "match_parent"
app:navGraph= "@navigation/navigation"
app:defaultNavHost= "true" />
</LinearLayout>
</layout>
この時点でアプリを動かしてみると、ボタンは反応しないがFragment01が表示されている。
(寄り道)DataBindingの設定# MainActivity.ktとFragment02.ktのDataBindingを設定しておく。
MainActivity.ktを編集する。
1
2
3
4
5
6
7
8
class MainActivity : AppCompatActivity () {
private lateinit var binding : ActivityMainBinding
override fun onCreate ( savedInstanceState : Bundle ?) {
super . onCreate ( savedInstanceState )
binding = DataBindingUtil . setContentView ( this , R . layout . activity_main )
}
}
Fragment02.ktを編集する。
 1
 2
 3
 4
 5
 6
 7
 8
 9
10
11
12
class Fragment02 : Fragment () {
private lateinit var binding : FragmentFragment02Binding
override fun onCreateView (
inflater : LayoutInflater , container : ViewGroup ?,
savedInstanceState : Bundle ?
): View ? {
binding = DataBindingUtil . inflate ( inflater , R . layout . fragment_fragment02 , container , false )
return binding . root
}
}
ボタンが押された時の遷移の設定# Fragment01.ktを編集する。
view.findNavController()でNavigationを取得し、navigate(actionのid)で遷移する。
 1
 2
 3
 4
 5
 6
 7
 8
 9
10
11
12
13
class Fragment01 : Fragment () {
private lateinit var binding : FragmentFragment01Binding
override fun onCreateView (
inflater : LayoutInflater , container : ViewGroup ?,
savedInstanceState : Bundle ?
): View ? {
binding = DataBindingUtil . inflate ( inflater , R . layout . fragment_fragment01 , container , false )
binding . button . setOnClickListener { view : View ->
view . findNavController (). navigate ( R . id . action_fragment01_to_fragment02 )
}
return binding . root
}
}
これでアプリを動かしてみる。“Click"ボタンを押すとFragment02に遷移するはず。
今回はここまで。他にも、異なるFragment間のデータの受け渡しだったり、遷移時のアニメーションだったり、まだ学べることはありそう。